Pro Pattern Layout Tips + Comment for a Chance to Win a Prize Pack!
The latest issue of Sew News is jam-packed with free e-patterns, along with tips and techniques to adjust, correct and make those patterns work for you. Read on to take this refresher course on pattern layout and learn to prep your patterns like a pro. Plus, comment below for a chance to win a pattern prize pack from Indygo Junction!

The Pattern
- Referring to the view you’d like to make, cut out the pattern pieces you’ll be using. Completely separate all the pattern pieces for the project.
- Press the pieces flat with a dry, warm iron. Pressing will make cutting easier and more accurate.
- Organize pieces by separating lining and interfacing from the remaining fabric, then put in numerical order.
The Layout
- Circle the pattern layout guide you’re using to avoid confusion. Look over the layout before pinning the pattern pieces to the fabric.
- Work on a large, flat surface so you can spread the fabric out flat. If you’re table isn’t large enough, work with one section at a time. However, don’t cut any pattern pieces until all are pinned in place.
Tip: For best results, don’t let fabric hang off the table edge. Support it with a chair or roll it so it won’t tug and stretch. If you must cut on the floor, a hard floor is better than carpet. If you’re working on carpet, spread out a bedsheet or a cardboard cutting surface and place the fabric on it. Try and keep your fabric as smooth and wrinkle-free as possible!
- Fold the fabric as noted in the layout, usually in half lengthwise, making sure the selvages are even.
- Pin the pattern pieces in place. Read your pattern carefully to determine if the printed side should be up or down.

- Use a ruler or measuring tape to make sure the pattern grainline is equidistant from the fabric edge for its entire length. Once in position, pin the pattern in place along the grainline, then double check the grain by measuring the distance between the line and the fabric edge at each end (A).
- When the grainline is straight, place pins around the pattern perimeter.
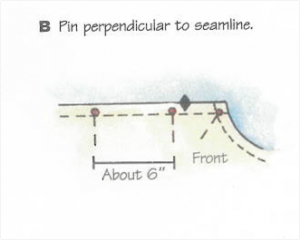 1/4″ inside the cutting line and perpendicular to the edge (B). Space pins about 6” apart. If the pins will damage the fabric, pin only in the seam allowances.
 - If the fabric has a nap, like velvet or corduroy, use the “with nap” layout, with all the pieces laid out in the same direction.
- If the fabric has a large design, you’ll want to consider where the design will fall on the body when the garment is complete. For example, if your fabric has large roses on it, you probably don’t want them to be centered on the bust point.
- Take a break after pinning the project. When you return, double-check your layout before cutting.


Don’t forget to check out the latest issue of Sew News for more great patternmaking tips and techniques, plus more than 30 full color photo how-tos!
What tips and tricks do you have for working with patterns? Tell us below for a chance to win this Indygo Junction prize pack!


Join the Conversation!